Low-Code Automation for Image Workflows with Pipedream | The Step-by-Step Guide
Introduction
Pipedream is a dynamic integration and automation platform designed for developers who want to link different web applications without deep diving into complex coding. The platform is particularly versatile for "low-code" operations, allowing users to deploy pre-built components for routine tasks while providing the flexibility to insert custom scripts for more tailored needs. This guide will walk you through automating complex workflows, such as document handling, online file storage manipulation, and advanced image analysis using artificial intelligence—all through Pipedream.
In the fast-paced digital world, automating routine tasks can significantly boost efficiency and reduce human error. This guide focuses on automating the creation of draft commercial offers for moving companies—a process that typically requires significant manual input and time. By harnessing AI-powered image recognition and the power of low-code automation through Pipedream, moving companies can instantaneously generate preliminary cost estimates based on client-submitted photographs. This capability not only enhances customer service but also streamlines internal processes, potentially giving businesses a competitive edge.
Sample Workflow: Automating Commercial Offer Drafts
Motivation
Estimating costs for services can be cumbersome, especially when those services involve variable factors such as household moving. Traditionally, moving companies need extensive lists of items from customers to provide even a ballpark figure, which can be a barrier for customer engagement. This workflow automates the estimation process by using photos provided by the client, leveraging AI to identify and list items quickly. This rapid response can prevent customers from turning to competitors and improve operational efficiency by reducing the workload on staff.
Description
We will create a workflow that performs the following steps:
Monitor a Google Drive Folder: Automatically detect new photos uploaded to a designated folder. These photos are expected to contain images of furniture and household items to be moved.
Process Images with AI: Use an AI-powered recognition API to analyze the photos and list identifiable items along with their quantities.
Generate Preliminary Offers: Create a new Google Spreadsheet document and populate it with the data obtained from the AI analysis to draft a preliminary commercial offer.
Step-by-Step Guide to Implementing the Workflow
In this tutorial, we'll walk you through setting up a sample workflow using Pipedream's low-code platform. This workflow capitalizes on the following applications and actions to automate the process seamlessly:
Google Drive: Utilized for file management, particularly for storing and monitoring new photo uploads that will trigger the workflow.
API4AI: Deployed for its advanced capabilities in recognizing and quantifying furniture and household items within photos.
Google Spreadsheets: Used for generating new documents that will house the preliminary data extracted and computed from the images.
Custom Code Blocks: These will serve to integrate and automate specific actions within the workflow for enhanced functionality.
Please ensure you have an active Pipedream account to implement this workflow. If you haven't registered yet, sign up at Pipedream to get started. This account will allow you to access all necessary resources and deploy the workflow smoothly.
Step 1: Create a Google Drive Folder
Before diving into the Pipedream workflow, the first task is to create a designated folder in Google Drive. This folder, which we will name "Incoming Photos," will be monitored by our workflow to detect new uploads. Here's how to set it up:
Personal Google Drive Users: Simply create a new folder in your existing Google Drive account and name it "Incoming Photos".
Google Workspace Users: If you have a corporate account, you have the option to either create a standard folder in your Drive or set up a Shared Drive for enhanced access and collaboration across your team.
This folder will serve as the entry point for the photos that will trigger the automated workflow. Ensure it is readily accessible and properly configured to accept file uploads.
Step 2: Create a Pipedream Workflow


To get started with your automated workflow:
Navigate to the Resources Tab: Locate and click the "New" button within the "Resources" tab on the Pipedream dashboard.
Name Your Workflow: Assign a meaningful name to your workflow that reflects its purpose.
Configure Workflow Parameters: Although optional, you can customize various parameters to optimize the workflow. These adjustments include setting the memory limit, toggling automatic retries on errors, and managing cold start behaviors. While many options are accessible under the free plan, some features might require a subscription to a paid plan. For simplicity, we will proceed with the default settings in this tutorial.
Step 3: Configure the "New Files" Trigger
To set up our workflow to respond to new file uploads automatically, we'll integrate a trigger using the Google Drive app within Pipedream.

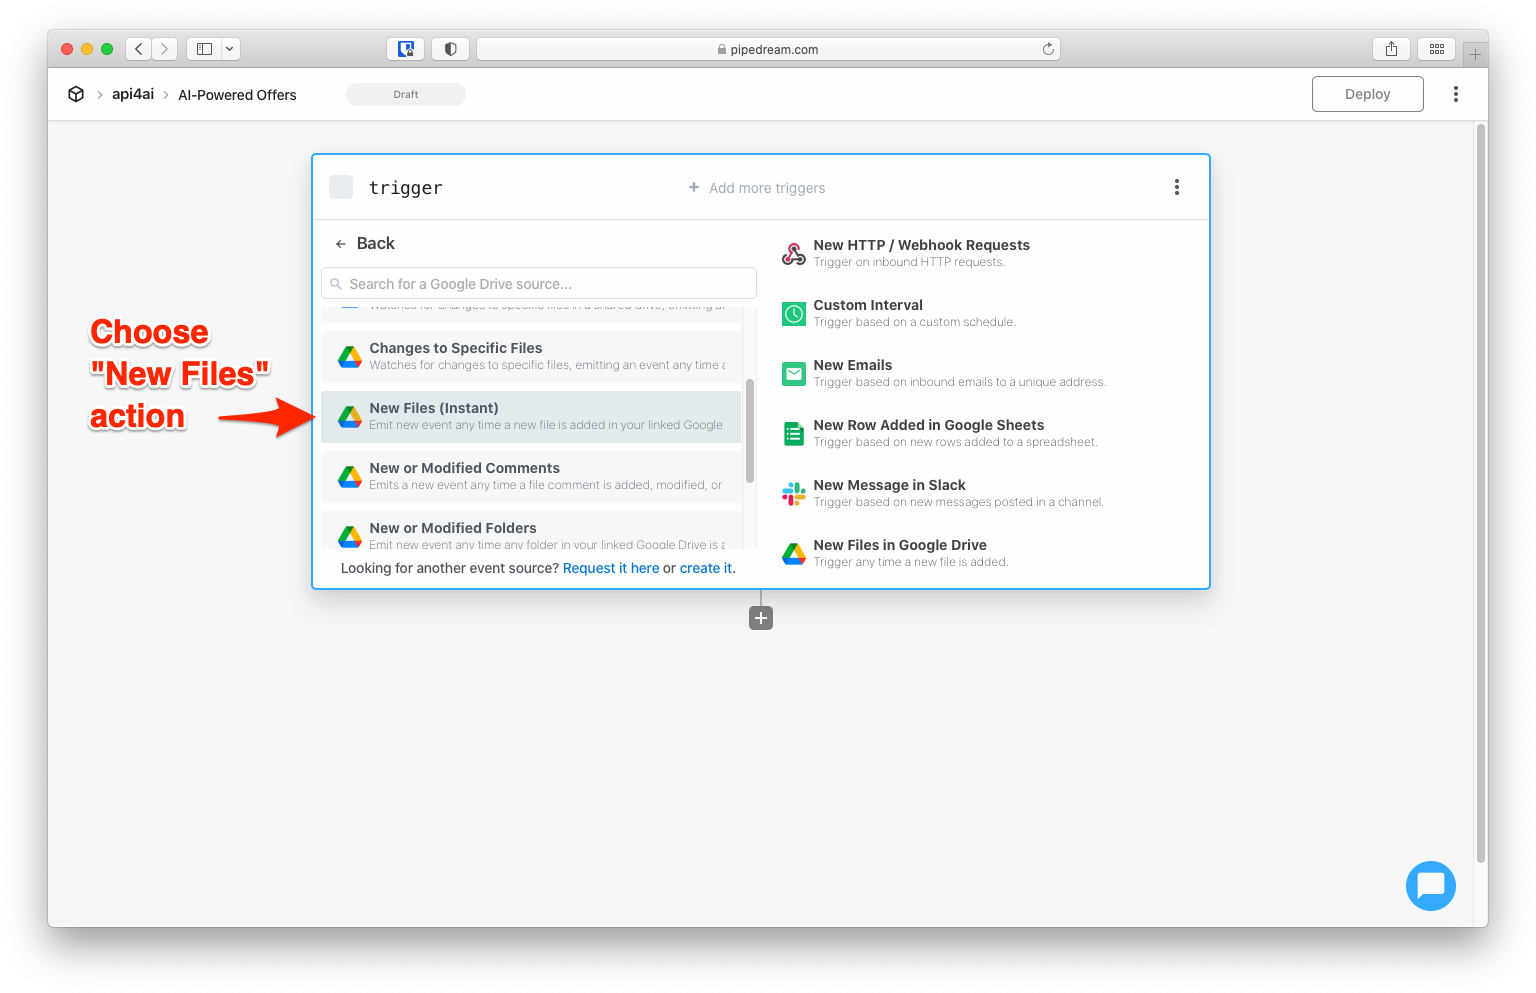
Add the Google Drive Action:
Click the "+" symbol in your Pipedream workflow editor.
Search for and select the "Google Drive" app.
From the list of actions provided, find and choose "New Files (Instant)" to monitor new file uploads in real time.


Authenticate Your Google Drive Account:
Upon adding the Google Drive action, you will be prompted to authenticate with your Google account. This step ensures that Pipedream can access the Google Drive where the workflow will operate.
Follow the authentication instructions in the popup window, making sure to grant all necessary permissions by checking the "Select all" option.
Configure Trigger Properties:
The "New Files" trigger requires you to specify which "Drive" and "Folders" it should monitor. It's crucial to select the correct values to ensure the workflow operates as intended.
For this tutorial, choose "My Drive" and the "Incoming photos" folder. Although "My Drive" is typically the default option, explicitly setting it helps avoid any potential confusion.
By properly setting up this trigger, your workflow will be ready to detect any new photos uploaded to the specified folder instantly, setting the stage for subsequent automation steps.
Step 4: Validate the Trigger

To ensure that your trigger is set up correctly and is operational, it's important to perform a test:
Upload Test Files: Simply drag and drop a few photos into the "Incoming photos" folder on your Google Drive, which is being monitored by your Pipedream trigger.
Verify the Trigger Response: Observe the behavior of the trigger in Pipedream. If everything is configured correctly, the trigger should detect the new file event and activate the associated actions within your workflow.
This testing step is crucial to confirm that the workflow will function as expected when new files are uploaded, thus preventing any disruptions in your automated processes.
Step 5: Filter for Image Files
Our workflow is designed to process images only. To ensure that no other file types disrupt the workflow, it's advisable to add a safeguard that halts the process if a non-image file is uploaded. This precaution is optional but highly recommended to maintain the integrity of the workflow.


Here’s how to add a filter to verify the file type:
Identify the MIME Type:
After successfully testing the "New Files" trigger, navigate to the "Exports" tab of the trigger's output.
Expand the output details to locate the "mimeType" property of the uploaded file. This is the key property that we will check to determine the file type.
Add Custom Code Action:
Below the "New File" trigger in your workflow, add a "Run Custom Code" action.
Pipedream allows the use of several programming languages for custom code; we will use Node.js for this example. The following script checks the MIME type of the file against accepted image formats (JPEG and PNG) and terminates the workflow if the file is not an image:
export default defineComponent({
 async run({ steps, $ }) {
   // Get mime type of the uploaded file using previous step data.
   // Abort workflow execution if uploaded file is not a PNG or JPEG file.
   const mimeType = steps.trigger.event.mimeType;
   if (mimeType.match(/image\/(jpeg|png)$/) === null) {
     $.flow.exit(`${mimeType} is not acceptable. Abort workflow execution.`);
   }
 }
})
Step 6: Download the Image File
To proceed with image analysis, the image file needs to be downloaded to a local storage area within the Pipedream execution environment. Pipedream allocates a certain amount of storage for this purpose, the extent of which may vary based on your subscription plan.

Setting Up the File Download:
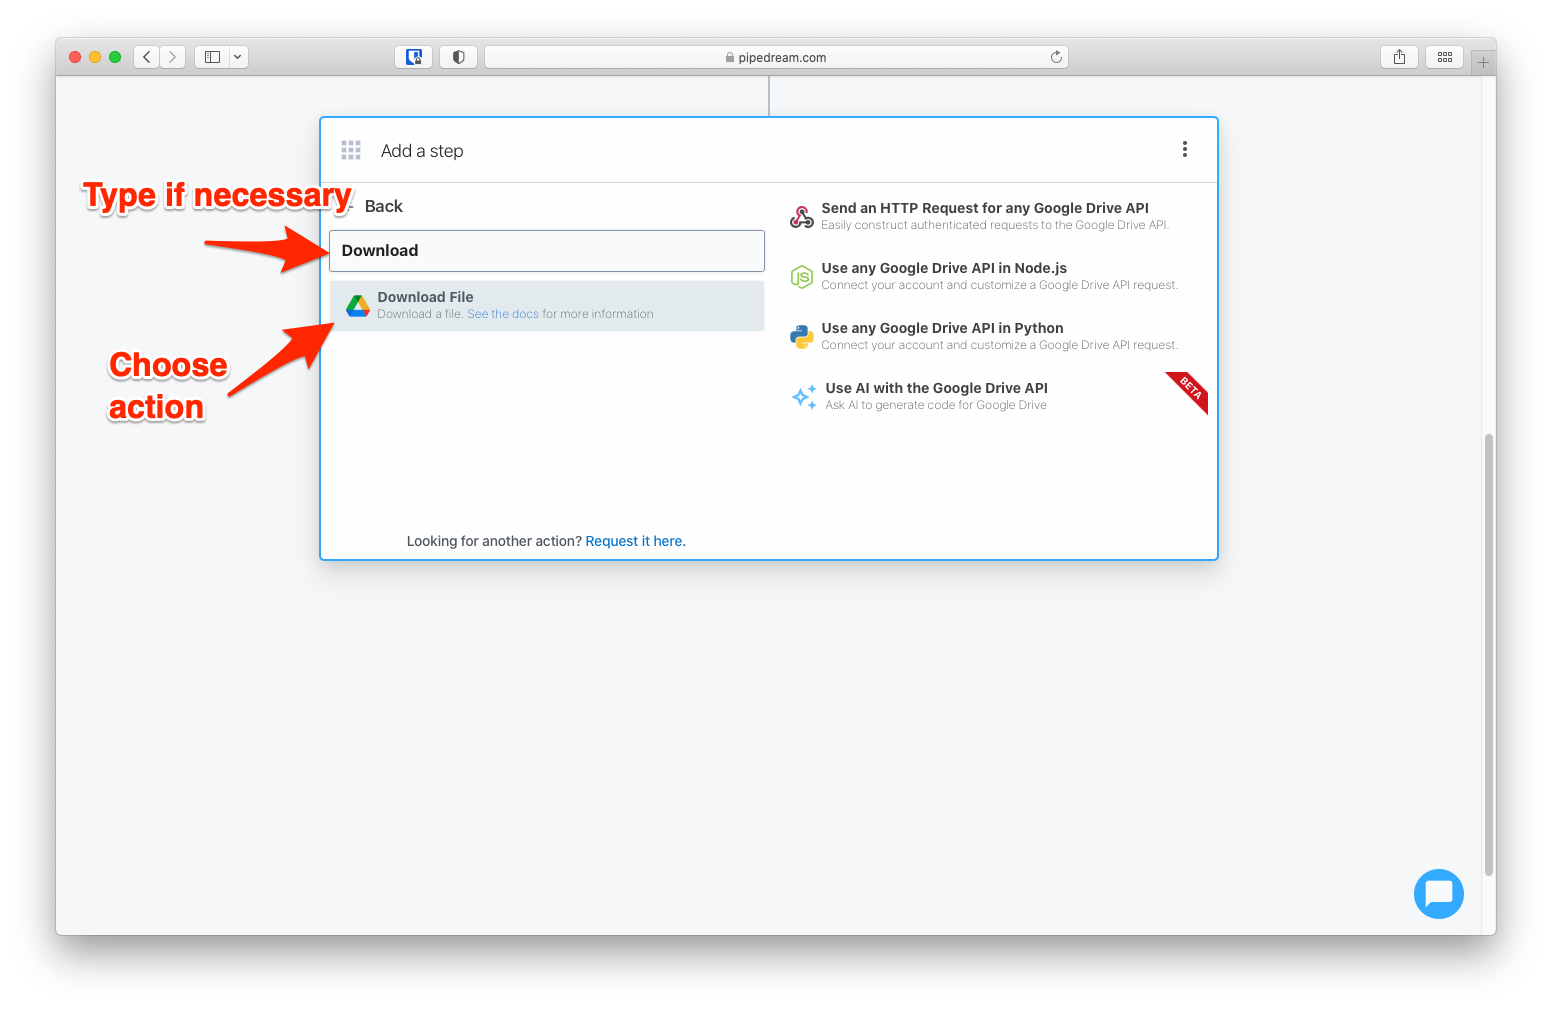
Add the Download Action:
In your workflow, add a new step by selecting the "Google Drive" app, then choose the "Download file" action.
This action, like the "New File" trigger, requires authentication with your Google account. Ensure you authenticate it to access the necessary files.
Remember to use the same Google Drive as configured in the "New File" trigger for consistency.
Configure the File and Destination Path:
You need to specify which file to download and where to save it. For an automated workflow, these values should be dynamically set based on the files triggering the workflow.
Set the "File" property to {{steps.trigger.event.id}}, which dynamically fetches the file ID from the previously triggered event.
The output path for the downloaded file should be in a temporary directory. We recommend using the path /tmp/{{steps.trigger.event.name}} to maintain the original file name for simplicity and clarity.
Once you have configured the download parameters, conduct a test by uploading a new photo to the designated Google Drive folder. Verify that the file is correctly downloaded to the specified path in your Pipedream workspace.
Step 7: Acquire an API Key for Image Recognition
For this workflow, we will utilize the "Furniture & Household Items Recognition" solution provided by API4AI, a prominent provider of AI-driven cloud-based solutions. This API will analyze the images to identify and quantify items, facilitating automatic estimation processes.


Accessing the API:
Explore the API:
Before integrating the API into your workflow, you can explore its capabilities without registration here.
Register and Obtain an API Key:
Visit RapidAPI and register for an account if you haven’t already. RapidAPI is a comprehensive API marketplace that hosts various APIs for different purposes.
Subscribe to the Furniture & Household Items Recognition API provided by API4AI.
Navigate to the API’s endpoint list.
Your API Key will be displayed under the "Header Parameters" section as X-RapidAPI-Key.
For more information on how API keys function and why they are necessary, refer to RapidAPI's blog article: "What is an API Key?".
API4AI offers both free and paid subscription plans. For trial purposes and basic implementation within Pipedream, the free plan is usually sufficient. It provides a reasonable number of credits that allow you to test and deploy your workflow without immediate investment.
Step 8: Analyze the Image
At this stage, our workflow is set up to automatically detect and download new photos from Google Drive into the Pipedream execution environment. Assuming you have subscribed to the "Furniture & Household Items Recognition" API at the RapidAPI hub and obtained your API key, we are now ready to proceed with adding the image analysis functionality.
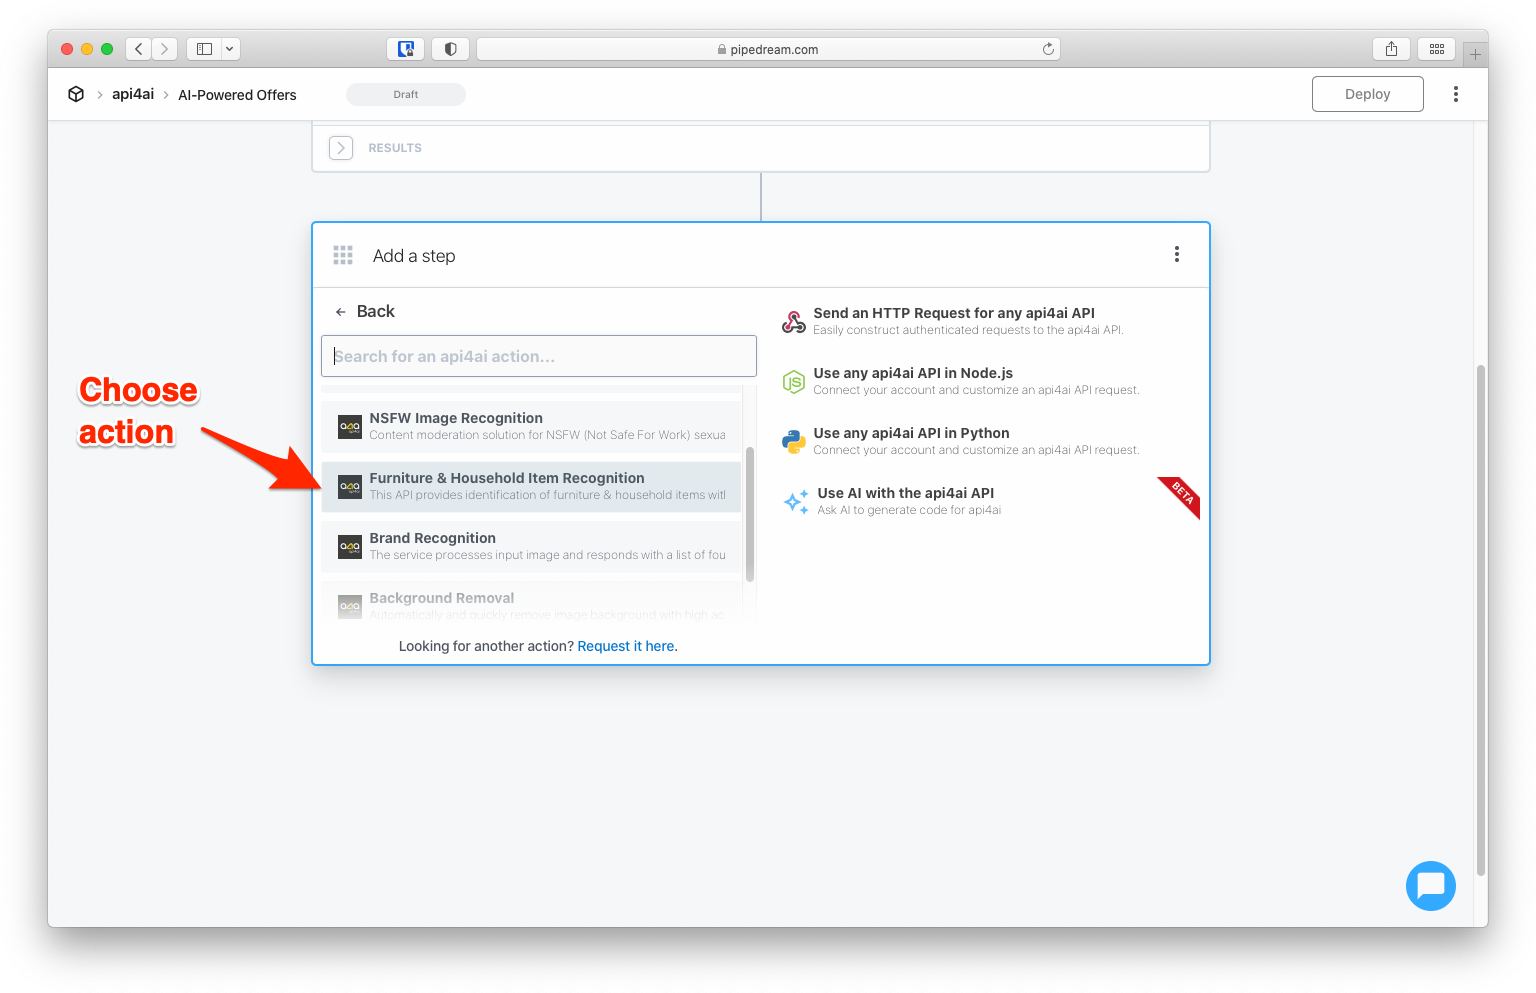

Adding the Image Recognition Action:
Insert the API Action: Add a new step to your workflow as you have done previously. In the app search dialog within Pipedream, type "api4ai" and look for the "Furniture & Household Item Recognition" action.
Configure the API Key: Input your API key in the "Api4ai Account" section to authenticate the action. This key should be the one you obtained from RapidAPI.
Set the Image Path: Specify the path where the downloaded image is stored; you should use the dynamic path constructed from the previous "Download file" action: /tmp/{{steps.download_file.$return_value.name}}

Click the "Test" button to run the image recognition. This step is crucial as it verifies that the API correctly analyzes the image and returns the expected data.
By integrating and setting up this API, the workflow will be able to analyze uploaded images for furniture and household items, making it a vital component of our automated process. This function not only enhances efficiency but also ensures the data needed for the subsequent steps is accurate and reliable.
Step 9: Prepare a Spreadsheet Template
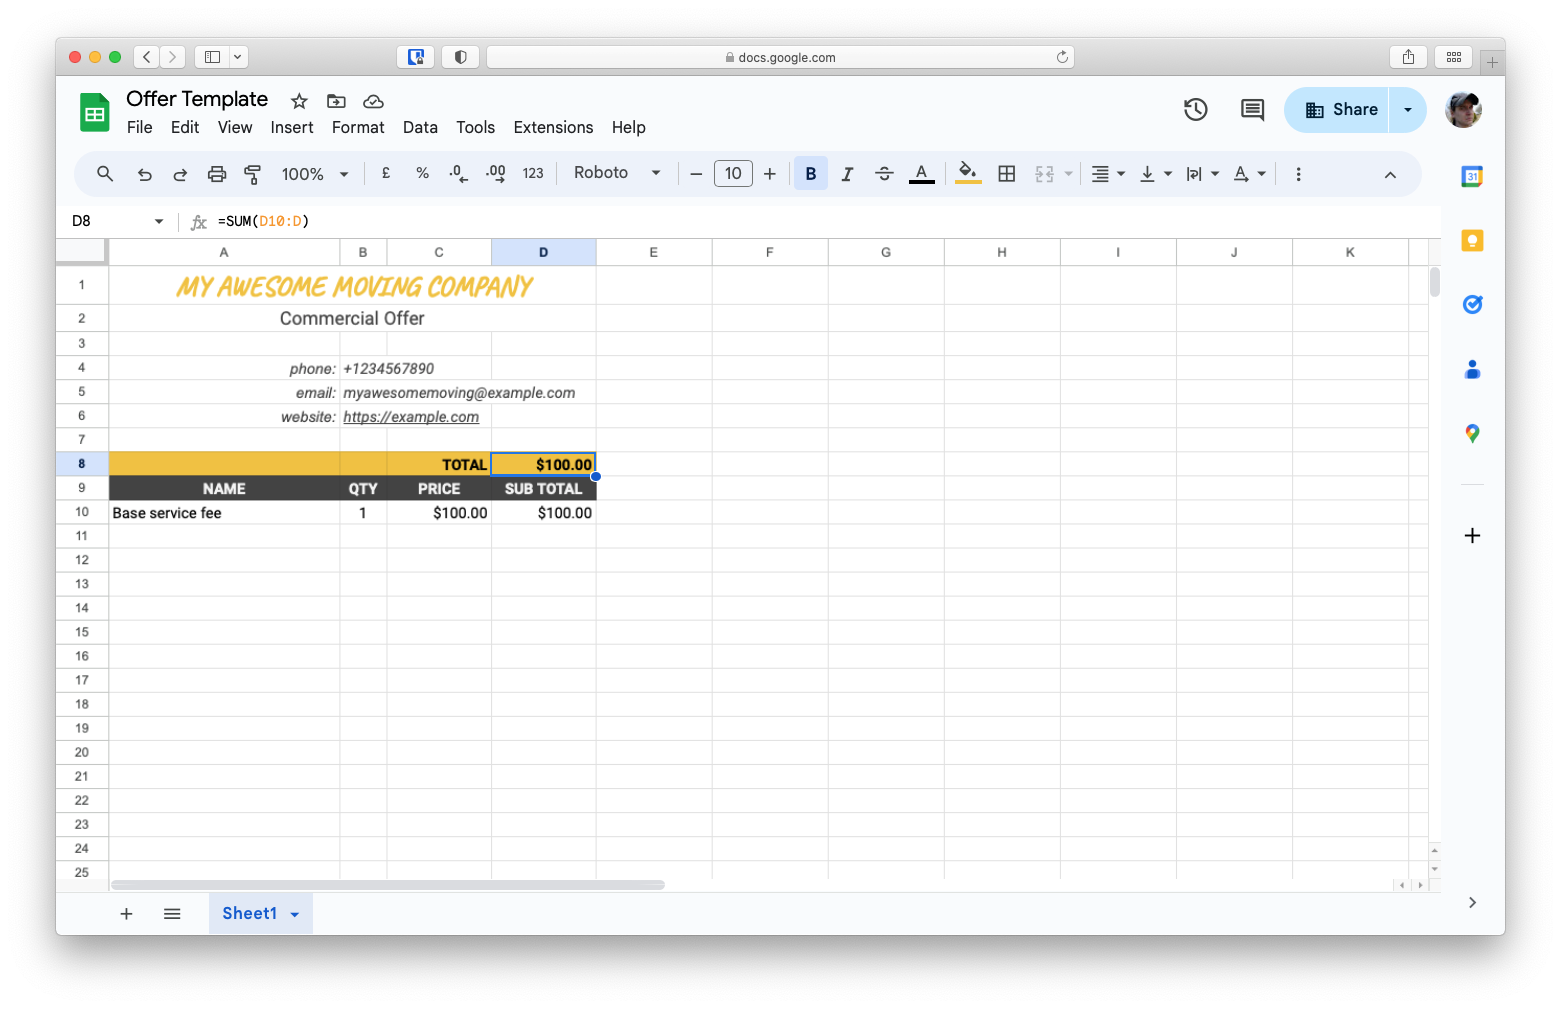
Creating an appealing and informative offer document is crucial for making a professional impression. For this purpose, we'll use a Google Spreadsheet as a template that can include elements like your company logo, contents, and other branding essentials.
Setting Up the Document Template:
Access the Template: You can start by using our sample template available on Google Drive. Click the link to view and make a copy of it to your Google Drive. Alternatively, you may create your own custom template that better fits your company’s branding and reporting style.
Template Location: While you can store this document in any Google Drive folder, we recommend keeping it in the same drive as the input photos for simplicity. This reduces the complexity of managing multiple storage locations and streamlines the workflow.
Step 10: Duplicate the Template for Each Client
To manage each new incoming photo, we'll automate the creation of individual spreadsheet documents based on the template prepared in the previous step. This involves setting up an action to duplicate the template for each photo processed. By automating the duplication of the spreadsheet template, each new photo upload will trigger the creation of a new, pre-formatted document.

Configuring the Copy File Action:
Add the Copy File Action: In your Pipedream workflow, add a "Copy file" action from the "Google Drive" app. This action is responsible for duplicating the template spreadsheet.
Set the File Property: Specify the template spreadsheet that you prepared. You do not need the exact ID of the file; instead, you can easily select the template from a dropdown list presented in the user interface. This selection process uses the visual elements of the UI to simplify the configuration.
Step 11: Prepare row to add to Spreadsheet
To populate our spreadsheet with data, we need to format the output from the image recognition step appropriately. This process involves a bit of custom coding to transform the raw data into a structured format that can be easily inserted into the spreadsheet.

Setting Up the Custom Code Action:
Add the Custom Code Action: Insert a "Run Custom Code" action in your workflow and name it "prepare_rows". This step will handle the data preparation for spreadsheet entry.
Code Implementation: Use the following Node.js script to structure the data into rows that the spreadsheet can accept. Each row will contain the item name, quantity, calculated price, and subtotal:
export default defineComponent({
 async run({ steps, $ }) {
   // Init array of rows to return.
   const rows = [];
   // Populate rows.
   const items = steps.furniture_and_household_item_recognition.items;  // alias
   for (const [item, qty] of Object.entries(items)) {
     const price = item.length * 2;  // for simplicity we set "price" as twice number of chars in item name
     const subtotal = qty * price;
     rows.push([item, qty, price, subtotal])
   }
   return rows;
 },
})
Explanation of the Code:
The script begins by initializing an array named
rowsthat will store each entry for the spreadsheet.It then retrieves the items identified by the
furniture_and_household_item_recognitionstep.For each item, the script calculates the price as twice the length of the item's name (a simplified pricing model), computes the subtotal, and appends the data as a new row in the
rowsarray. In a real-world application, prices would typically be retrieved from a database reflecting current rates and inventory. However, for the sake of simplicity and to keep this tutorial focused on the automation aspect, we're using a basic calculation for pricing.
As with other steps, ensure to test this action to verify that the data formatting aligns with the needs of your spreadsheet. This ensures that when the data reaches the spreadsheet, it populates accurately and consistently.
Step 12: Insert Data into the Spreadsheet
Now that we have prepared the data rows from the image analysis, the final step in our workflow involves populating these rows into the newly created spreadsheet copy.

Configuring the Action:
Add the 'Add Multiple Rows' Action: In your Pipedream workflow, incorporate an "Add Multiple Rows" action from the Google Spreadsheet app. This action is designed to batch insert data rows into a spreadsheet, making it efficient for our needs.
Specify the Spreadsheet ID: Set the "Spreadsheet" parameter to use the ID of the spreadsheet that was duplicated earlier. This is dynamically sourced from the output of the "Copy file" action using the placeholder {{steps.copy_file.$return_value.id}}
Define the Sheet Name: Explicitly specify the sheet name where the rows will be added. In this tutorial, we are using "Sheet1" as the target sheet.
Set the Rows to Insert: For the rows to be inserted, use the result from the "prepare_rows" action. Place the placeholder {{steps.prepare_rows.$return_value}} in the configuration to dynamically insert the processed rows.
This step completes the setup of our automated image workflow using Pipedream. By automating the data entry process into a spreadsheet, we effectively reduce manual data handling errors and increase efficiency, allowing for real-time updates and management.
Step 13: Deploy and Test the Workflow
With all components now in place, your workflow is fully assembled and ready for deployment. This final step ensures that everything functions as intended and that the automation provides the expected results.
Click the "Deploy" button to finalize your workflow settings. This action makes your workflow active and ready to monitor your Google Drive for new photo uploads.

Testing the Workflow:
Upload a Test Image: To test the workflow, simply upload a new photo to the "Incoming photos" folder in your Google Drive. This simulates the real-world usage of the workflow as it would occur when a client submits a photo.
Monitor Workflow Activation: Once the photo is uploaded, Pipedream will automatically trigger the workflow. The processing time is generally brief, taking just a few seconds.
Verify the Outcome: Upon completion of the workflow, check the status in Pipedream. A successful execution will be indicated by the status "Success".


Navigate to your Google Drive to find the newly created or updated spreadsheet. Open it to ensure that it contains all the expected information correctly formatted according to the data derived from the uploaded image.
Conclusion
Congratulations! You've successfully set up a complete low-code automated image workflow using Pipedream. This workflow not only automates the estimation process for moving services based on client-submitted photos but also streamlines data management, significantly reducing manual input and increasing efficiency.
By integrating AI with routine workflows, companies can significantly enhance efficiency, reduce operational costs, and improve customer satisfaction. As we continue to embrace digital transformation, tools like Pipedream will become indispensable in our toolkit for innovation and business agility. Explore Pipedream's capabilities further to discover other workflows that can benefit your business.