Autoencoders Explained: Denoise & Compress Pics
Introduction — Why Autoencoders Matter in 2025
In today’s visual-first digital world, the need for faster, smarter image processing has never been greater. From e-commerce marketplaces trying to deliver perfect product photos to mobile apps running in bandwidth-limited environments, the pressure is on to keep images both high-quality and efficient. That’s where autoencoders come in — a deep learning technique that can clean up noisy images, compress them for faster transfer and even spot unusual patterns that don’t belong.
Let’s break it down.
What is an Autoencoder?
An autoencoder is a special kind of neural network designed to learn efficient representations of data — in this case, images. It works by taking an input image, squeezing it down into a compact format (called a latent representation) and then trying to reconstruct the original image as closely as possible.
This isn’t just a fancy form of copying. During this compression and reconstruction process, the autoencoder learns to focus on the most important features of the image while ignoring noise and irrelevant details. That makes it incredibly useful for tasks like:
Denoising images captured in low-light or messy environments
Compressing images into smaller file sizes for faster transmission
Detecting anomalies or inconsistencies that differ from the norm
Why Should You Care?
The practical benefits of autoencoders go far beyond academic interest. In 2025, companies and developers are using autoencoders across real-world applications such as:
Cleaning up blurry or grainy camera feeds in retail and security systems
Reducing photo size for faster e-commerce loading times, especially on mobile
Detecting abnormal patterns in medical imaging, manufacturing lines or automated quality checks
Enabling privacy-first storage by keeping only compact representations instead of sensitive visuals
Autoencoders are helping organizations move toward a world where visual data is not just abundant, but optimized — for performance, clarity and insight.
What This Guide Covers
This blog post is your beginner-friendly deep dive into the world of autoencoders, focusing specifically on their use for:
Image denoising (removing visual noise or corruption)
Image compression (making pictures smaller without killing quality)
Anomaly detection (spotting what’s different or wrong in an image)
Deploying autoencoder pipelines effectively across cloud, edge and hybrid environments
By the end, you’ll not only understand how autoencoders work — you'll also see how they can be applied to real business and product challenges, giving you a valuable edge in any image-driven workflow.
Let’s jump in.
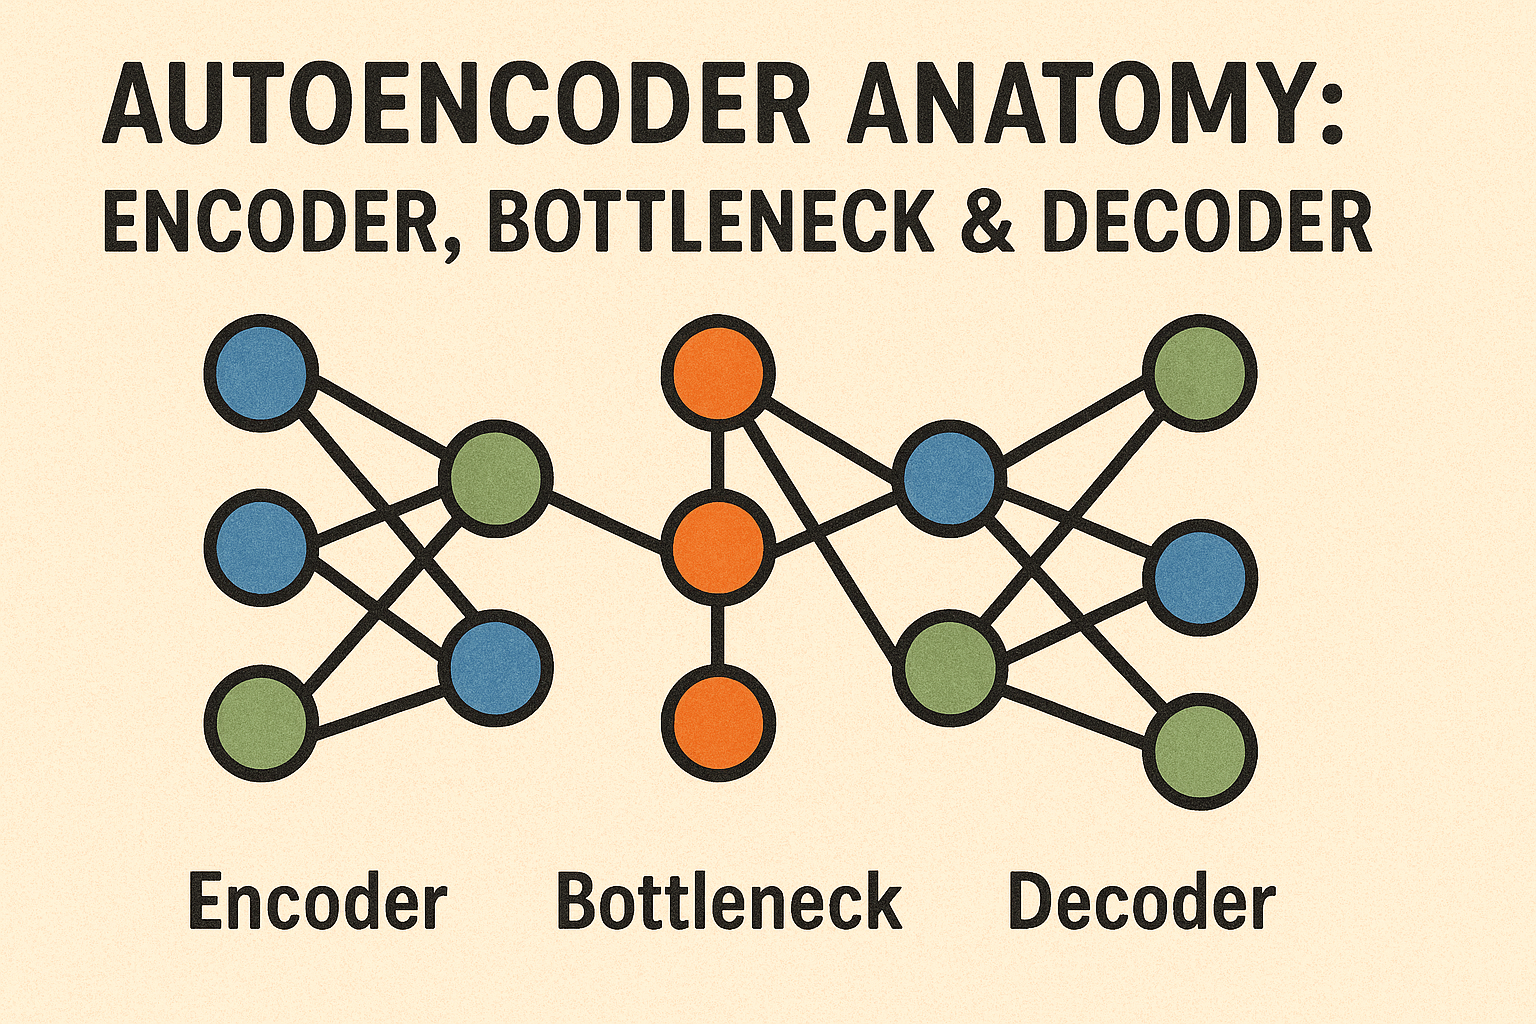
Autoencoder Anatomy: Encoder, Bottleneck and Decoder
To understand how autoencoders work their magic, you need to look at their basic structure. Think of an autoencoder as a sandwich — the input image goes in on one side, it gets compressed in the middle and then it’s rebuilt on the other side. This structure has three key parts: the encoder, the bottleneck and the decoder.
The Encoder: Extracting What Matters
The encoder is the first half of the autoencoder. Its job is to take the input image and gradually reduce its size while keeping the most important information. It does this using several layers of convolutional filters (in the case of images) or other neural network layers that specialize in recognizing patterns like edges, shapes or textures.
As the image passes through the encoder layers, it becomes smaller and more abstract. Think of it like shrinking a photo down to a very small version that still "understands" what's in it — like a fingerprint of the original image.
The Bottleneck: Where Compression Happens
Right in the middle of the network is the bottleneck. This is the most compressed version of the data — a small vector or array of numbers that holds all the most useful features needed to reconstruct the original image.
This part is important for two reasons:
Compression: The fewer values in this latent space, the less data you need to store or transmit.
Feature learning: The network is forced to learn meaningful and efficient ways to represent the image, instead of memorizing every detail.
The size of this bottleneck is a trade-off. A very small bottleneck compresses better but might lose fine details. A larger bottleneck gives better quality but uses more space.
The Decoder: Rebuilding the Picture
The decoder is the second half of the autoencoder. It takes the compact latent representation and tries to reconstruct the original image from it. Essentially, it's reversing the steps of the encoder.
Just like the encoder, the decoder uses layers (often upsampling and convolution layers) to increase the size of the data and restore structure. A well-trained autoencoder can output an image that’s nearly identical to the input — even if it was noisy or partially corrupted.
Types of Autoencoders You Might See
There are many variations of the basic encoder-bottleneck-decoder idea. Here are a few popular ones used in real-world image processing:
Convolutional Autoencoders (CAE): Perfect for visual data like photos, they use convolutional layers to preserve spatial features.
Denoising Autoencoders: These are trained by adding random noise to input images, teaching the model how to restore clean versions.
Sparse Autoencoders: These force most of the neurons in the bottleneck to stay inactive, leading to more efficient feature learning.
Variational Autoencoders (VAE): Unlike standard autoencoders, VAEs learn to generate new data as well — useful in creative applications or simulations.
How Do We Measure Success?
To see how well an autoencoder is doing, we usually look at two things:
Reconstruction loss: A measure of how different the output image is from the input. Lower is better.
Quality metrics like PSNR (Peak Signal-to-Noise Ratio) and SSIM (Structural Similarity Index), which tell us how close the reconstruction is to the original in terms of both pixel-level and perceptual quality.
Autoencoders may look simple on the surface, but the way they compress and restore images unlocks powerful use cases — especially when combined with noise, bandwidth or storage constraints. In the next section, we’ll explore one of their most exciting capabilities: removing noise to bring clarity to corrupted images.
From Noisy Pixels to Crystal-Clear Images: Image Denoising with Autoencoders
Whether it’s a grainy photo taken in low light or a surveillance feed affected by motion blur, noise is a common problem in image processing. Traditional filters like Gaussian blur or median smoothing help, but they often remove useful details along with the noise. Autoencoders take a smarter approach — learning to separate signal from noise by understanding the patterns behind clean images.
What is Image Denoising?
Image denoising is the process of removing unwanted distortion — such as grain, random specks or fuzzy textures — from a picture, while preserving the true content. It’s essential in many industries:
Retail: Enhancing product photos taken with cheap cameras
Security: Improving footage from low-resolution CCTV systems
Healthcare: Cleaning up X-rays or MRIs for better diagnostics
Publishing & Archiving: Restoring old, degraded scans and documents
How Autoencoders Learn to Denoise
The idea is surprisingly elegant. You take a clean image and artificially add noise to it — like random pixels or blurry smudges. Then you train the autoencoder to take the noisy version as input and learn to reconstruct the clean original version as output.
This forces the network to understand what a clean image should look like, not just memorize pixel positions. Over time, the autoencoder learns to “filter out” the noise and retain the key structures.
This process creates what’s known as a denoising autoencoder — a variant that’s specifically trained to repair corrupted inputs.
Better Than Traditional Filters
Why not just use a regular denoising filter? Here’s how autoencoders stand out:
Learned restoration: Instead of using fixed rules, they adapt to the type of image (e.g., faces vs. landscapes).
Edge preservation: They remove noise while keeping edges, textures and fine details intact.
Context awareness: They can guess missing or unclear parts of the image using patterns seen in the training data.
For example, in a photo of a face, a denoising autoencoder won’t just blur out the grain — it will keep the contours of the eyes, lips and nose intact, even if they were partially hidden by noise.
Training a Denoising Autoencoder
Building a denoising model involves:
Data preparation
Collect or generate pairs of clean and noisy images. For some use cases, you might not even need clean images — methods like Noise2Void allow self-supervised learning directly from noisy data.Noise simulation
Add synthetic noise (Gaussian, Poisson, motion blur) to clean images during training.Model training
Use a convolutional autoencoder architecture, minimize reconstruction loss between the denoised output and the clean target.Evaluation
Use PSNR and SSIM to evaluate how close the denoised image is to the original.
Real-World Use Cases
Here’s where denoising autoencoders shine in actual products and workflows:
Smartphones: Improve photo quality without needing expensive sensors
Surveillance systems: Clarify noisy night-time footage or compressed video streams
Document digitization: Remove dust, creases or scan artifacts from pages
Telemedicine: Deliver clearer images over slow internet connections
Impressive Results, Even at Scale
On standard datasets like Kodak or BSD68, denoising autoencoders have achieved:
PSNR improvements of 2–5 dB over classic filters like BM3D
Cleaner, more visually appealing outputs in side-by-side comparisons
Fast inference speeds, making them viable for real-time or mobile applications
Autoencoders don’t just clean up pictures — they learn to restore meaning. By identifying what really matters in an image, they offer a more intelligent and reliable solution to denoising than rule-based methods. In the next section, we’ll see how the same structure can be used to compress images without sacrificing detail.

Shrinking Pics Without Losing Detail: Learned Image Compression
As the amount of visual data grows, so does the need to store and transmit images efficiently. Whether you're running an online store, hosting user-generated content or powering an AI-driven mobile app, image compression is critical for speed, storage and user experience. Traditionally, we’ve relied on formats like JPEG or PNG — but deep learning, especially autoencoders, is now opening the door to a new level of compression that’s both smarter and more adaptable.
What is Learned Image Compression?
At its core, image compression is about reducing file size while maintaining as much visual quality as possible. Traditional compression methods use hand-crafted rules, like transforming image data into frequency components (e.g., JPEG’s Discrete Cosine Transform) and removing less noticeable details.
Learned image compression, on the other hand, uses neural networks — often based on autoencoder architectures — to automatically discover the most compact way to represent an image. The key idea is simple: let the network decide what information is important to keep and what can be discarded or approximated.
How Autoencoders Compress Images
Here’s how it works in practice:
Encoding phase
The encoder reduces the image into a latent representation — a much smaller array of numbers than the original image.Quantization
The latent values are rounded or compressed further, so they can be stored or transmitted more efficiently.Decoding phase
The decoder takes the compressed latent representation and reconstructs an image that closely resembles the original.
The result is a compressed version of the image that requires less storage space and less bandwidth, but still looks very close to the original when viewed by a human.
Why It's Better Than Traditional Methods
Autoencoder-based compression has a few key advantages:
Content-aware compression: Unlike JPEG, which uses the same logic for every image, neural networks can learn to treat photos of faces differently from landscapes or product shots.
Better quality at lower file sizes: Learned methods often outperform JPEG and WebP at higher compression ratios, especially in preserving fine textures and reducing artifacts like blockiness or color banding.
Adaptability: You can fine-tune the autoencoder for specific types of images — product photos, medical scans or satellite imagery — to get even better results.
Real-World Applications
Neural image compression isn’t just a research concept — it’s being used in production today, often in scenarios where visual performance and size efficiency are both critical:
E-commerce platforms
Compress thousands of product photos for fast-loading mobile experiences while preserving key details like fabric texture or label text.Cloud storage & delivery
Reduce storage costs and speed up content delivery networks (CDNs) by sending compressed latent representations instead of full-resolution files.Video and drone imagery
Use learned compression to manage large volumes of visual data from surveillance cameras or drones without sacrificing resolution.Healthcare
Compress large diagnostic images (e.g., CT scans) for quicker upload and analysis — critical in remote diagnostics or telehealth platforms.
Metrics That Matter
When evaluating how effective a learned compression method is, several key metrics come into play:
Compression ratio: How much smaller is the compressed image compared to the original?
PSNR (Peak Signal-to-Noise Ratio): Measures how similar the compressed image is to the original — higher is better.
SSIM (Structural Similarity Index): Evaluates perceptual quality, focusing on structure and detail rather than pixel-perfect accuracy.
Bitrate efficiency: How many bits are needed per pixel to achieve a certain quality?
Many deep-learning-based approaches can achieve 40%–70% smaller file sizes than JPEG while maintaining equal or better visual quality, especially on complex or high-resolution images.
Bringing Compression to the Edge
One of the most exciting trends is deploying autoencoder-based compression on edge devices. With lightweight models and formats like ONNX or TensorRT, companies are now able to run compression directly on smartphones, cameras or drones — saving time and data costs before even sending images to the cloud.
By letting AI learn what matters most in an image, learned compression with autoencoders provides a powerful alternative to traditional codecs. It’s fast, flexible and built for the realities of 2025, where every megabyte counts. Next, we’ll see how this same architecture can be used to detect when something’s not quite right — by finding visual anomalies.

Spotting the Odd One Out: Autoencoders for Anomaly Detection
Not all images are clean and predictable. In many industries, it's just as important to know what doesn't look normal as it is to process routine visuals. Whether it’s a defective part on a factory line, an unusual shadow in a medical scan or a tampered product photo uploaded to an online store — identifying visual anomalies quickly and accurately is critical.
Autoencoders offer a surprisingly elegant way to handle this challenge, using the same principles they rely on for denoising and compression.
How Autoencoders Detect Anomalies
An autoencoder is trained to reconstruct only the kind of data it has seen before. That’s the key idea behind anomaly detection.
Here’s how it works:
You train the autoencoder on a large dataset of “normal” images — for example, flawless product photos or images of healthy tissue.
When the model is later shown an image with something unusual or unexpected, it struggles to reconstruct it accurately.
The reconstruction error (the difference between the input and the output) becomes a signal. If it’s high, the model is basically saying: “This doesn’t look right”.
This method is unsupervised — you don’t need to label defects or unusual content in advance. The model learns what should be there and flags what’s not.
Practical Use Cases for Visual Anomaly Detection
Autoencoder-based anomaly detection is now used in a wide variety of fields. Here are some key applications:
Manufacturing and quality control
Detect scratches, misalignments or missing components in assembly lines — even when defects are rare and hard to label in advance.Healthcare diagnostics
Spot abnormalities in X-rays, MRIs or CT scans by flagging tissues that deviate from healthy examples.Cybersecurity and content moderation
Identify tampered or suspicious images, such as doctored ID photos or inappropriate uploads in user-generated content platforms.Logistics and e-commerce
Detect out-of-place items, packaging damage or unauthorized modifications in product photos submitted by sellers.
Setting a Threshold: When is Something “Too Different”?
The core output of anomaly detection is the reconstruction error. But how do you decide what level of error is acceptable?
There are several ways to handle this:
Fixed threshold: Set a specific cutoff point based on validation data.
Percentile-based threshold: Flag images with error values in the top 5% or 1%.
Statistical models: Use distributions (e.g., Gaussian) fitted on reconstruction errors from normal data to calculate anomaly scores.
The right threshold depends on your application. A factory might need to catch every tiny defect, while a retail platform might tolerate some variation.
Visualization Helps
One of the advantages of image-based anomaly detection is that you can actually see where the problem is.
By comparing the original image to its reconstruction, you can generate a difference map that highlights the areas with the biggest discrepancies. This makes it easier for human reviewers to quickly validate whether an alert was accurate or not.
Lightweight and Scalable
Autoencoder-based anomaly detection can also be:
Compact: Small models can be trained and deployed with minimal hardware.
Fast: Inference takes milliseconds, making it suitable for real-time inspection.
Adaptable: You can retrain on new “normal” data as patterns evolve, without needing to gather huge sets of rare anomalies.
A Safety Net for Visual Systems
In an increasingly automated world, it’s impossible to manually check every image, scan or visual input. Autoencoders give machines the ability to raise a flag when something doesn’t match what they’ve learned — offering a reliable, data-driven safety net.
In the next section, we’ll explore how these models are trained, optimized and deployed in real-world environments — from the cloud to the edge.
Building & Deploying Autoencoder Pipelines in the Real World
Autoencoders are powerful tools for denoising, compressing and detecting anomalies in images — but to turn that power into real value, you need to build and deploy them properly. This section walks through what it takes to bring an autoencoder from a concept in your Jupyter notebook to a working solution in a live system — whether it's running on the cloud, in a mobile app or on the edge.
Start with the Right Data
Autoencoders are data-hungry. The more examples they see, the better they understand what "normal" looks like. Here’s how to get your data pipeline right:
Diverse, high-quality images
Whether you’re compressing product photos or detecting defects in car parts, the training data should represent all the typical variations you expect in real use.Augmentation is key
Techniques like rotation, flipping, zooming or adding synthetic noise help the model generalize better and avoid overfitting.Patch-based training
If you’re working with high-resolution images, consider breaking them into smaller patches. This saves memory and makes training faster without losing detail.
Training Tips for Better Results
Autoencoders are relatively simple to train, but a few strategies can take your model from “works okay” to “production-ready”:
Use a pretrained encoder
Starting from models like VGG or ResNet (trained on ImageNet) can speed up training and improve feature extraction, especially when data is limited.Adjust the bottleneck size
If you want better compression, make the latent space smaller. If you want higher reconstruction quality, use a larger one. It’s a trade-off.Regularization
Add dropout, sparsity constraints or noise during training to improve robustness and generalization.Monitor more than loss
Use image quality metrics like SSIM and PSNR during validation to track how well the model is really doing beyond just minimizing pixel difference.
Choosing the Right Deployment Strategy
Once trained, your autoencoder needs to be served in a way that fits your use case. There’s no one-size-fits-all answer — here are some popular options:
1. Cloud deployment
Ideal for scalable, centralized processing.
Great for handling bursts of traffic
Easy to update models and monitor performance
Supports large, resource-heavy models
Use when: you're processing images uploaded by users or serving multiple clients from one central service.
2. Edge deployment
Ideal for offline or low-latency use cases.
Works on devices like smartphones, drones, factory sensors
Reduces cloud costs and avoids bandwidth bottlenecks
Keeps sensitive data local, improving privacy
Use when: real-time results are needed or when internet access is limited or expensive.
3. Hybrid deployment
Combine the best of both: use edge for quick filtering and cloud for deep processing or retraining.
From Model to API
To make your autoencoder available to others — or even other parts of your own system — consider wrapping it into an API:
Use frameworks like FastAPI, Flask or TensorFlow Serving to expose the model as an HTTP endpoint.
Accept image input, return either the reconstructed image, the compressed representation or an anomaly score.
Secure your endpoints with API keys or authentication layers.
Add monitoring and logging to track usage and detect any issues.
Keep It Optimized
Even after deployment, your model needs care. Here are a few maintenance tips:
Watch for concept drift
Over time, the kinds of images you receive might change. Monitor reconstruction loss trends — if it rises steadily, retraining may be needed.Tune performance
Use tools like TensorRT, ONNX Runtime or PyTorch Mobile to speed up inference on edge devices.Compress the model
Use quantization or pruning to reduce the model size and memory usage without sacrificing much accuracy.
Privacy and Compliance Considerations
Because autoencoders don’t need to store or send raw images, they can be a smart choice for privacy-sensitive applications. In some setups, you can save or transmit only the latent representation, which contains compressed features but not identifiable information — a huge plus for GDPR or HIPAA-compliant systems.
Autoencoders are more than just clever neural nets — they’re practical tools for solving real-world image problems. With the right data, smart training and a thoughtful deployment plan, you can use them to power anything from faster websites to smarter factories. In the final section, we’ll wrap up with a recap and explore what’s next in this fast-evolving field.

Conclusion & Next Steps
Autoencoders might seem simple at first glance, but as we’ve seen, they unlock powerful capabilities across many image-related tasks. From cleaning up noisy photos to reducing image file sizes and even flagging visual anomalies that don’t belong — autoencoders are proving to be a reliable and versatile solution in modern computer vision workflows.
Let’s recap what we’ve covered and look ahead to where this technology is headed.
Recap: Why Autoencoders Matter
Autoencoders offer a unique advantage: they don’t just transform images — they learn what’s important in them. This ability makes them ideal for tasks where context, patterns and subtle details matter.
Here’s what makes them stand out:
Image denoising
They go beyond simple filters by restoring clean, detailed images that are visually appealing and practically useful.Image compression
By encoding only essential features, they reduce image sizes significantly without sacrificing quality — saving bandwidth, storage and load time.Anomaly detection
Their sensitivity to unfamiliar input makes them powerful tools for quality control, content moderation and medical screening.Flexible deployment
From powerful cloud platforms to lightweight edge devices, autoencoders can be adapted to fit virtually any infrastructure.
Real-World Impact
Businesses and developers are already putting autoencoders to use in:
Retail & e-commerce
Automatically improving image quality, speeding up product page loading and detecting manipulated listings.Manufacturing & logistics
Spotting defects and inconsistencies before they cause costly delays or returns.Healthcare
Enhancing clarity in diagnostic images and assisting doctors with anomaly detection.Media & entertainment
Compressing and restoring content without visible loss in quality, even for streaming and mobile apps.
This flexibility makes autoencoders a solid addition to any image processing pipeline.
What’s Next: Evolving Trends in Autoencoder Tech
As technology progresses, autoencoders are evolving too. Here are a few trends worth keeping an eye on:
Masked autoencoders (MAE)
Inspired by natural language processing models, MAEs reconstruct missing parts of images, opening up new opportunities for pretraining and image inpainting.Diffusion models
These combine with autoencoder architectures to generate extremely high-quality images — useful for synthetic data creation and advanced editing.Smarter compression codecs
Autoencoders are being integrated into next-gen image standards, potentially replacing legacy formats with learned compression layers.Better privacy tools
More developers are exploring ways to store or transmit only latent representations, reducing risks when handling sensitive images.
Your Next Step: Explore the Possibilities
Whether you’re optimizing content delivery, improving image quality or building a smarter way to spot outliers, autoencoders provide a strong foundation. Start experimenting with prebuilt models or consider training your own on domain-specific data. Evaluate the balance between using out-of-the-box tools and crafting a custom pipeline that fits your exact needs.
Autoencoders aren’t just another AI model — they’re a gateway to more intelligent, efficient and privacy-conscious image processing. As visual data keeps growing, the smart use of autoencoders can help you stay ahead of the curve.